
Amenity renderings are pre-construction images of shared lifestyle spaces such as clubhouses, pool decks, fitness centers, resident lounges, rooftop terraces, courtyards, and coworking areas. For multifamily, hospitality, and residential projects, they help teams show how those spaces are expected to feel, function, and support the property experience before construction is complete.
The right amenity visual is not simply the most polished image. A pool dusk hero still, a clubhouse brochure image, a site-context aerial, and a 360 walkthrough each answer a different need. Choosing well means matching the deliverable to the audience, project stage, source information, review process, and final channel before production starts.
Table of Contents
- What amenity renderings are and what they usually show
- Which amenity rendering deliverables fit which use
- How project stage and source information affect realism and accuracy
- What to provide before amenity rendering production starts
- The workflow problems that cause rework, delays, and mismatched visuals
- How to choose the right amenity rendering package for your project
- FAQ
- What to Do Next?
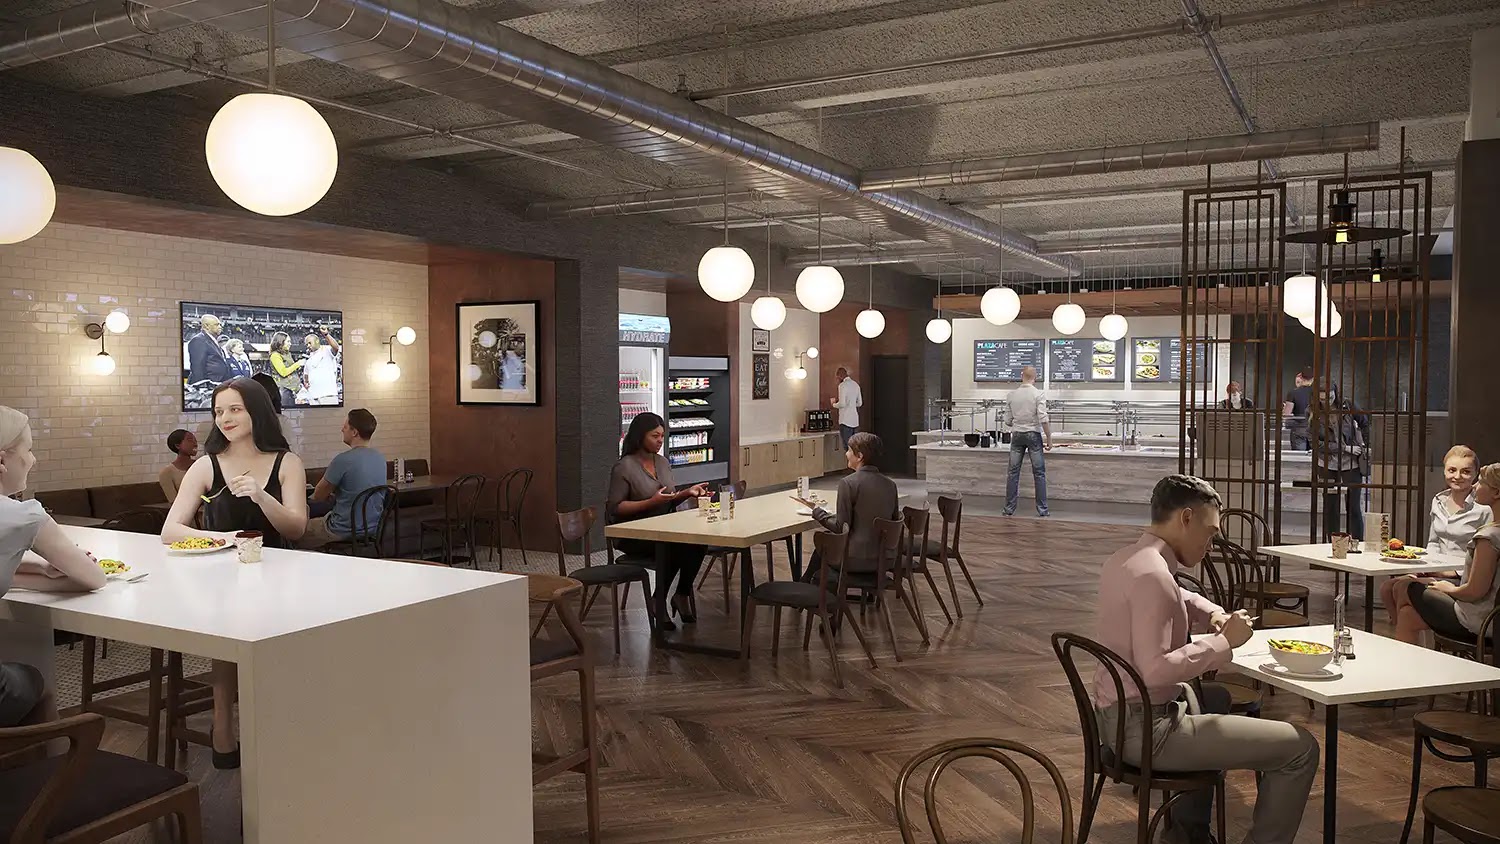
Dining Amenity
Assess Seating and Circulation in Context
The dining layout and seating arrangement support discussion of shared amenity use.
What amenity renderings are and what they usually show
Amenity renderings show the shared spaces that often shape how a property is understood before it opens. In a multifamily project, that might mean a pool deck, clubhouse, fitness center, resident lounge, rooftop terrace, courtyard, coworking area, dog wash, game room, or hospitality-style lobby extension. In a resort, condominium, or senior living project, the same idea applies to the spaces where people gather, relax, exercise, host guests, or experience the character of the place.
That makes amenity visualization slightly different from a straightforward exterior building image. The architecture still matters, and accuracy still matters, but the image also has to explain use. A pool rendering may need to show seating zones, shade, planting, evening lighting, and the relationship between the water, cabanas, and adjacent building. A clubhouse rendering may need to clarify material warmth, furniture scale, circulation, bar or coffee areas, and the kind of resident experience the design is trying to support.
These images can support leasing websites, brochures, listing pages, signage, investor presentations, internal design review, and some public-facing presentations. The best use depends on the audience. A leasing team may need images that make the amenity package feel tangible to future residents. An ownership group may need to compare whether the clubhouse, courtyard, or rooftop is carrying the strongest positioning message. An architect may need to test whether the ceiling, lighting, and furniture plan feel believable at eye level.
One useful way to think about amenity renderings is that they sit between design explanation and experience explanation. They should not replace drawings, finish schedules, or design review, but they can make the intended atmosphere easier to understand. When the source information is reliable, they can also help teams catch unresolved decisions before those decisions appear in marketing materials.
Which amenity rendering deliverables fit which use
Most amenity rendering packages start with still images because stills are flexible. A strong hero still can be used on a leasing website, in an investor deck, on a listing page, in a brochure, or as part of a leasing-center display. For many projects, a focused set of stills is more useful than a larger package that tries to show every amenity with equal weight.
Eye-level views are usually the clearest choice when the goal is to show what it feels like to occupy the space. A clubhouse rendering from the seating area, a fitness center rendering from the entry, or a courtyard view from the walking path can help the viewer understand scale, finish, lighting, and use. These views are especially helpful when the image needs to communicate a lifestyle moment rather than a site diagram.
Day and dusk variants can serve different presentation needs. A daytime pool image may show layout, landscape, furniture, and general openness. A dusk version may focus more on warmth, hospitality, reflections, fire features, exterior lighting, or social atmosphere. Dusk imagery can be compelling for rooftops, lounges, pool decks, and exterior gathering spaces, but it also requires lighting decisions that should be reviewed with care.
Aerials and site-context views answer a different question. They are useful when the viewer needs to understand where the amenities sit within the property, how a courtyard connects to the lobby, how a pool relates to surrounding buildings, or how a rooftop terrace frames a view. These views are often helpful for investor presentations, ownership review, phasing discussions, and site organization, but they may be less intimate than an eye-level lifestyle image.
360 tours, VR, and walkthroughs are worth considering when a project needs a more immersive presentation. They can help viewers understand spatial sequence, circulation, and relationships between rooms. They also add scope, platform decisions, and review needs. They are not automatically better than stills. If the website, brochure, signage, and leasing displays need focused imagery, a well-planned still package may be the more practical choice.
How project stage and source information affect realism and accuracy
Project stage should guide how polished and exact the amenity imagery needs to be. Early concept visuals can be looser if the team is still exploring massing, amenity placement, or general mood. In that stage, a stylized courtyard or clubhouse image may be useful because it leaves room for design movement. Asking for final-looking marketing imagery too early can make unresolved decisions appear more settled than they really are.
Pre-leasing, investor, and public-facing marketing uses usually call for more polished imagery based on more stable design inputs. At that point, the rendering team needs more than a general model. Geometry, finish direction, furniture references, lighting intent, landscape design, pool layout, signage, surrounding context, and facade materials may all affect whether the image feels credible and whether it stays consistent with the developing design.
Model reliability is especially important. A BIM or CAD file may include some elements that are dependable and others that are placeholders. LOD, or Level of Development, can help the team talk about that reliability in plain terms. LOD 100 may represent conceptual massing. LOD 200 may describe schematic geometry. LOD 300 or 350 may provide a more design-accurate basis for visualization. Those labels do not make a model ready for every rendering use, but they can help the team describe which parts are developed enough to reference and which are still placeholders.
The higher the realism, the more the viewer tends to read the image as a promise. That is useful when the design is mature and the intent is clear. It is risky when finishes, furniture, lighting, landscape, or context are still uncertain. If an amenity image will be used in an approval-sensitive or planning-related setting, the standard may be different again. Some uses may require documented vantage points, accurate surrounding context, and more verifiable representation than a lifestyle marketing image would require.
Free Guide
Plan Better Renderings Before Your Next Presentation
Use this quick guide to prepare clearer visual direction before project meetings, marketing reviews, or stakeholder presentations.
- Clarify the views your team needs before rendering starts
- Compare exterior, interior, and amenity visuals with more focus
- Prepare stronger notes for design, leasing, or marketing discussions
A practical checklist to help your team prepare.
What to provide before amenity rendering production starts
A practical amenity rendering handoff should explain the intended use before it lists files. Start with the audience and channel. Is the image for a leasing website, brochure, listing page, signage, investor deck, internal design review, approval-sensitive presentation, or leasing-center display? The answer affects composition, resolution, crops, accuracy, and review expectations.
The source package usually needs to include the current BIM or CAD model, floor plans, elevations, sections if relevant, reflected ceiling plans when lighting and ceiling design matter, finish schedules, FF&E references, lighting intent, landscape direction, pool or courtyard layout, and site or context photography. For interiors-heavy spaces such as clubhouses, lounges, coworking areas, and fitness rooms, furniture and styling references are not minor details. They are central to how the space reads.
Camera priorities should be set early. Decide which spaces carry the strongest message and what each view needs to explain. A pool deck may need a low, eye-level angle that shows water, seating, planting, and the building edge. A rooftop may need a view that captures both the social area and the skyline or surrounding context. A clubhouse may need one view for atmosphere and another for layout, depending on how the image will be used.
Output requirements should also be confirmed before production begins. Web images, print pieces, large-format signage, leasing displays, and presentation decks may need different dimensions, file types, crops, and levels of detail. If master files, layered files, alternate crops, day and dusk variants, or future third-party usage are expected, those needs should be clarified with the project team and provider before final delivery assumptions are made.
For projects using BIM workflows, a BIM Execution Plan or similar project document can clarify model sharing, authorship, file expectations, and which model is authoritative. Not every project needs a formal BIM plan for visualization, but every project benefits from knowing which drawings, models, and references the rendering team should rely on when conflicts appear.
The workflow problems that cause rework, delays, and mismatched visuals
Many amenity rendering problems start before production. One common issue is commissioning images before the audience and channel are clear. A social crop, a leasing office wall graphic, a brochure spread, an investor slide, and a context-verified planning image may all need different framing and output decisions. If those uses are discovered late, the original composition may not serve them well.
Another issue is treating every amenity as equally important. A project may have a pool deck, fitness center, rooftop lounge, courtyard, coworking room, pet amenity, and clubhouse, but not every space needs the same visual emphasis. The strongest package usually identifies the one to three spaces that carry the clearest lifestyle or positioning message, then supports those with secondary views only when needed.
Unstable design inputs can also create avoidable revisions. If the furniture package changes after the first review, the image may need more than a furniture swap. Seating layout, camera composition, lighting, reflections, entourage, styling, and circulation can all be affected. The same is true when pool geometry, planting, facade materials, signage, or ceiling design changes after an image has been developed.
Late camera changes are especially costly in complex amenity spaces. A camera lock is not meant to stop thoughtful review. It simply gives the team a stable point of view so furniture placement, lighting mood, landscape layers, reflections, and human activity can be developed around the same composition. Changing the view near the end can send many of those decisions back into review.
Approval structure matters as much as source files. Amenity visuals often cross architecture, interiors, landscape, ownership, leasing, and marketing responsibilities. If each group comments separately, the rendering team may receive conflicting direction on finishes, furniture, view selection, planting, brand tone, or lifestyle details. A named final approver and structured review rounds cannot remove every design change, but they can reduce preventable back-and-forth.
How to choose the right amenity rendering package for your project
The right amenity rendering package starts with the spaces that matter most. For one project, that may be a pool dusk hero image, a clubhouse brochure image, and a courtyard eye-level view. For another, it may be a rooftop terrace, a wellness suite, and one site-context aerial that explains how the amenity network fits together. The package should follow the property story, not a fixed image count.
Then match each deliverable to a channel and audience. Stills are usually the most flexible for websites, brochures, listing pages, ads, signage, leasing displays, and investor decks. Aerials are useful when context and organization matter. Walkthroughs, 360 tours, or VR can make sense when the presentation benefits from navigable space understanding, but they should be chosen for a clear purpose rather than novelty.
Realism should match project stage. Concept-stage imagery can stay lighter if design decisions are moving. Pre-leasing and public-facing marketing generally need more resolved geometry, finishes, lighting, landscaping, and furnishings. Approval-sensitive uses may need a different level of documented accuracy than lifestyle-oriented marketing. The question is not simply whether the image looks impressive; it is whether it is appropriate for the decision being made.
It also helps to plan for the actual downstream formats. A single wide image may not crop well for a vertical social placement, a website hero, a brochure spread, and large-format signage. If the same amenity image must serve several uses, discuss crops and resolution early. A more deliberate package may include one hero still, supporting detail views, day or dusk variants, and alternate crops rather than unrelated images of every shared space.
At its best, an amenity rendering package works as a small communication system. It shows the spaces that carry the strongest resident or guest experience, uses the right view type for each purpose, and stays honest about what the design information can support. That approach gives developers, architects, leasing teams, and ownership groups a clearer basis for deciding what to commission and what to prepare.
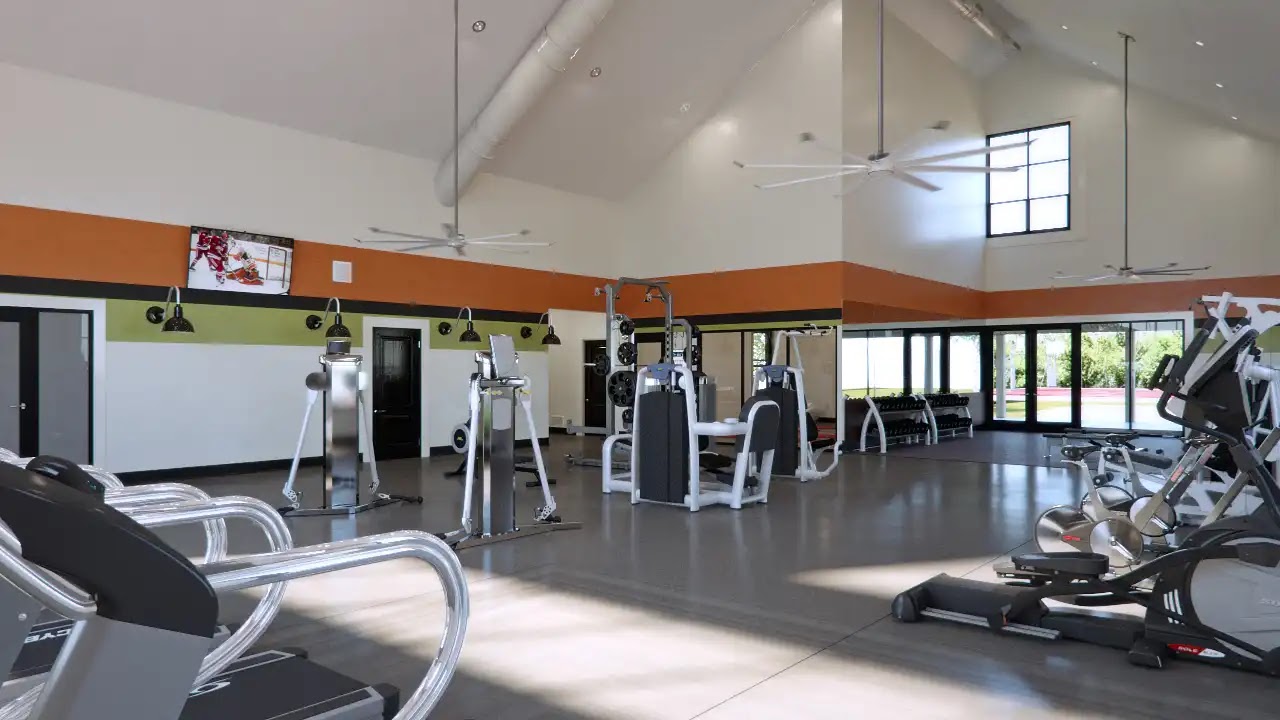
Fitness Amenity
Assess Layout and Equipment Placement
Compare how the gym layout organizes equipment, circulation, and daylight from the windows.
FAQ
What is the difference between an amenity rendering and a standard architectural rendering?
An amenity rendering focuses on shared lifestyle spaces and the resident or guest experience, such as a clubhouse, pool deck, lounge, rooftop, courtyard, or fitness center. A standard architectural rendering may focus more broadly on the building exterior, massing, lobby, unit interiors, or overall design intent.
How many amenity renderings does a multifamily project usually need?
There is no universal number. The right count depends on which amenity spaces carry the strongest positioning message, where the images will be used, whether stills or immersive formats are needed, and how focused the leasing or presentation package should be.
When are 360 tours or VR worth adding to amenity renderings?
360 tours or VR can be worth adding when pre-leasing, launch presentations, or high-value sales support benefit from navigable space understanding. They add scope and platform considerations, so they are not automatically necessary when a focused still-image package already serves the channels well.
What files and information should you send before an amenity rendering starts?
Send the current model, plans, elevations, model reliability or LOD notes, finish schedules, FF&E references, lighting and landscape intent, site or context photography, target channels, preferred views, output requirements, and the people responsible for design and final view approval.
Can the same amenity rendering be used for both marketing and planning submissions?
Sometimes there may be overlap, but the standards are often different. Marketing imagery may emphasize atmosphere and lifestyle, while planning, landmark, or approval-sensitive uses may require documented vantage points, accurate context, and a more verifiable representation of materials and surroundings.
Free Guide
Plan Better Renderings Before Your Next Presentation
Use this quick guide to prepare clearer visual direction before project meetings, marketing reviews, or stakeholder presentations.
Prefer to talk it through? Email us at info@rmdesignstudio.com or call 630.540.1222.
What to Do Next?
Before commissioning amenity visuals, make a short project brief that connects each requested image to a real use. List the top one to three amenity spaces that most need to be shown, then write where each image will appear: website, brochure, listing page, signage, investor deck, leasing display, or presentation.
Separate lifestyle marketing needs from any approval-sensitive or context-verified uses. Confirm the project stage and decide whether the imagery should be conceptual, polished for pre-leasing, or held to a more accuracy-driven standard. This helps prevent final-looking images from overstating design decisions that are still unresolved.
Gather the source materials that make the images credible: model files, plans, elevations, finish schedules, FF&E references, lighting mood, landscaping direction, site photography, and surrounding context. Then confirm output requirements such as file type, image dimensions, crops, web or print use, display needs, and day or dusk variants.
Finally, name who approves the camera views and who approves design content if those are different roles. Clear view priorities, reliable source information, and a simple review structure give the amenity rendering process a better chance of producing images that fit the project’s real decisions and channels.